Workflow Designer
Workflow Task Types
Individual tasks are the building blocks of a workflow. Basically, a task is something a user must complete before the next task can be started. You define each task, how long it should take to complete and which users are responsible for the task. You then connect the tasks to each other in the order they should be executed.

Starting Tasks
Starting tasks signify where a workflow will start. A workflow may have more than one starting task

Ending Task
Ending tasks signify when a workflow will end. A workflow may have multiple ending tasks, but the workflow will terminate when any one of the ending tasks are reached.

Decision Tasks
A decision task is a task that prompts the user with a true/false, yes/no type of question and is represented in the workflow designer by a diamond shape. Based on the response, the workflow will branch off into one of two different directions.
Decision tasks also serve as the starting and ending point for loops. All loops must start and end with a decision task.
Starting and ending tasks are required when using a decision task. The workflow may contain multiple ending tasks, but the workflow will terminate upon reaching an ending task.

Action Tasks
Action tasks will start another, asynchronous linked workflow when reached. The child workflow runs independent of the parent workflow. They can be completed, place on hold cancelled or deleted just as a normal workflow would.

Normal Tasks
Normal tasks are the work horse of Flowmingo and will make up the majority of your workflow tasks. These tasks are flexible enough to act as starting and ending nodes in simple workflows.
Creating A Workflow Process
Creating a Workflow Process is very easy. The Workflow Process Designer was created with simplicity in mind to stay out of your way.

-
Start by adding a start node

- Drag the start node to a good position.
-
Then add your first task

- Add more tasks, decision tasks or launcher tasks.
-
Connect your tasks in the correct order

-
Add an end node to the end of your process

- When it looks good click the publish button.
The published workflow will now appear in the "Start Tab" for your users.
About Workflow Templates
Workflow templates are templates for how a workflow will work once started. Within the Workflow Designer, users create tasks. You decide which users or groups should perform the task, how long the task should take and the order in which the tasks will be performed. Once the workflow template has been created and published, users are able to create workflow instances from the "Start Tab" using the workflow template.
Revisions
Once a workflow template has been used to create a workflow, you may longer alter the workflow template. Add, edit, reorder, delete tasks or change task assignments. In order to make a change, you must create a new revision of the workflow template and publish it.
Workflow template are not available to users to use until the template has been published. At which point, the template will appear in the "Start Tab"
Cloning
Cloning (copying) a workflow will create a new workflow template. The new template will an exact copy of the workflow template, its tasks, task assignments, form, visibility and starting options. Unlike a revision though, the cloned copy is unrelated to the original workflow template.
Managing Workflow Templates
Workflow designers are able to create, modify, copy and delete workflows from the Workflow Designer Tab.
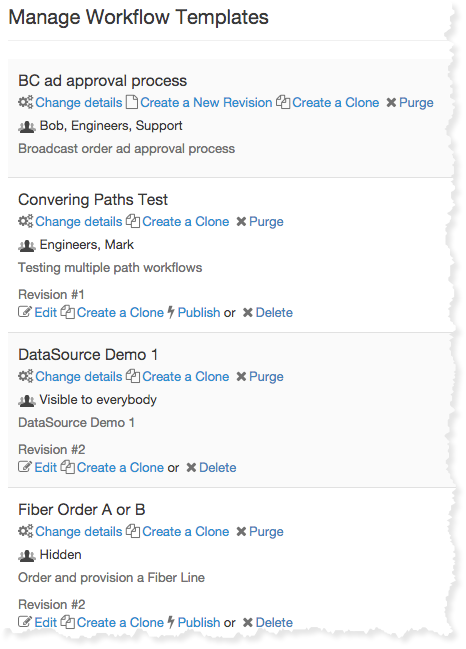
Actions
- Change Details
- Allows the user to change the workflow name, description, set workflow templates "Starting Option", assign a workflow data form or manage assigned users and "Start Tab" visibility.
- Edit
- If the workflow template is not published, this will open the Workflow Designer.
- Create A New Revision
- In order to change a template that has been published and used, you must create a new revision. Users will continue using the existing, published, version until you have completed and published the revision. At which point all new workflows created using the workflow template will use the current revision.
- Create a Clone
- Create an exact copy of the workflow template, its tasks and options. Unlike a revision, the cloned copy is unrelated to the original workflow template.
- Publish
- Publishing a workflow template will make it available on the Start Tab for users to use.
- UnPublish
- You may Unpublish a workflow template that has not been used to create a workflow. If you unpublish a revision, the previously published version of the template then becomes available on the Start Tab depending on the workflow templates visibility settings.
- Delete
- Deletes a workflow template that has not been used to create a workflow.
- Purge
- Deletes the workflow template, all the revisions and all the workflows ever created using the workflow template.
Starting Options
A workflow template may be created with or without "Starting Options". Starting options give the user the option to add additional information about this particular flow or information about when it should be completed or launched.
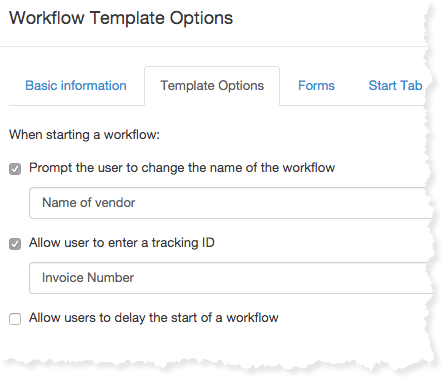
- Workflow Name
- You can customize the name of the workflow to better identify this particular flow.
- Tracking Number:
- You can add an internal tracking number to the flow otherwise Flowmingo will add a number automatically. Pro Tip: This field can also hold a name instead of a number and many client use this to associate a client name for example to the flow.
- Delayed Start
- You can choose a day to automatically start the flow or a day that the flow should be completed.
In this example, when the workflow is started, the user may enter the Vendor name and Invoice number. If the options are not used, Flowmingo will use the Workflow Template name and an internal Tracking ID by default. Users may edit the name and id at any point after the workflow has been created,
Who Can Start A Workflow
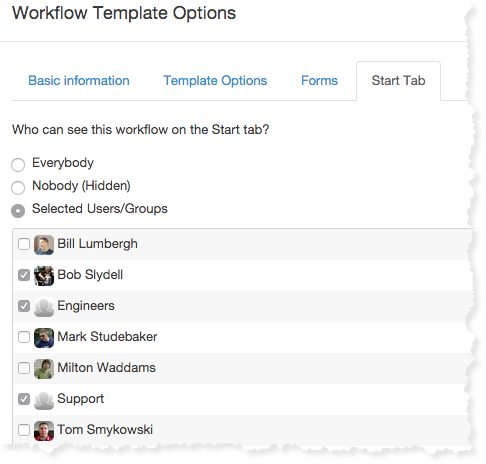
Workflow designers are able to designate which workflow templates users are able start. Workflow templates may be assigned to everybody, individual users, groups or hidden from everybody. Assigned workflow templates will appear in the "Start Tab"
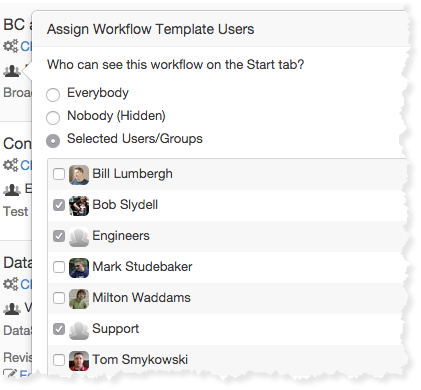
You may assign the workflow template users directly within the Workflow Designer or from the Workflow Designer tab via the "Change Details" option or by clicking on the users icon. Changing the workflow template users does not require a revision.
You may also directly assign users by clicking on the user icon
Organizing The Start Tab
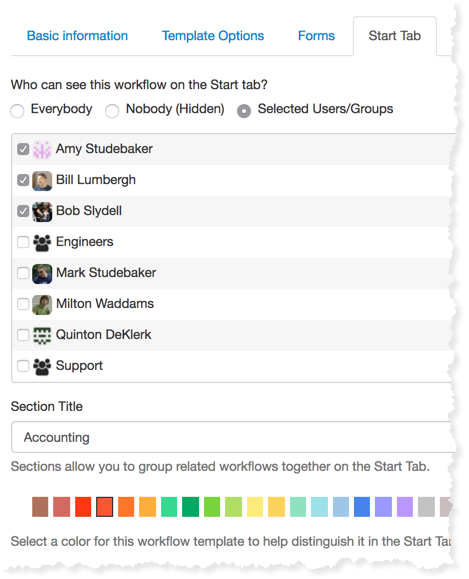
To help organize the "Start Tab" for users, workflow designers are able to assign a color to each workflow template to help quickly identify templates. In addition to colors, you may also create Workflow sections to group related workflow templates together.
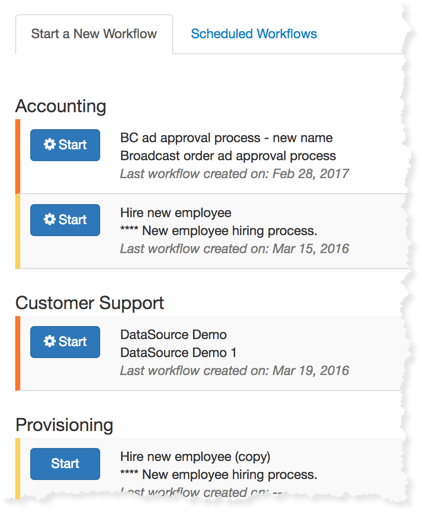
You may assign the workflow template a color and create a workflow section directly within the Workflow Designer or from the Workflow Designer tab via the "Change Details" option
Workflow Types And Branches
- Linear Task Workflow Processes
-
A linear workflow is the most basic workflow. It's just a series of tasks that will be completed one after another until the final task is completed. At which point, the workflow is considered completed.

A linear workflow is completed when all the tasks are completed.
- Parallel Task Workflow Processes
-
Parallel Tasks will usually split off of a common parent and then run concurrently.

In this example, Tasks #3 & #4 will start when Task #2 has been completed. Task#5 will not start until both Tasks #3 & #4 are completed.
- Branching Workflow Processes
-
A decision tasks is a task that prompts the user with a true/false, yes/no type of question and is represented in the workflow designer by a diamond shape. Based on the response, the workflow will branch off into one of two different directions.
A starting and ending task are required when using a decision task in a workflow. The workflow may contain multiple ending tasks, but the workflow will end upon reaching an ending task.
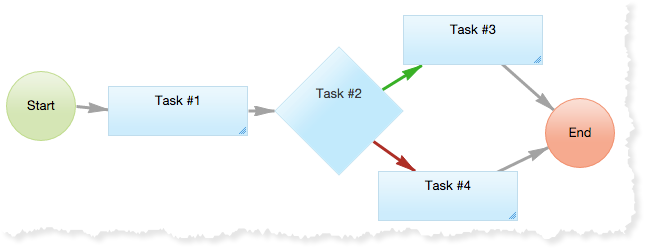
In this example, based on the user's choice, either Task #3 or Task #4 will be executed. The green connector represents a "yes" or positive choice while the red connector represents a "no" or negative choice.
- Loop Workflow Processes
-
Loops are controlled by decision tasks. A loop will always begin and end with a decision task
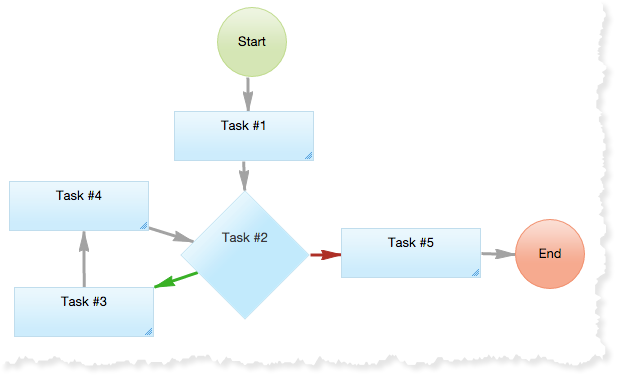
In this example, Task #4 and #4 will be executed every time the outcome of Task #2 is a "yes".
- Loops vs Reject Action
-
Flowmingo has the notion of rejecting back to a prior task. Sometimes a task is completed by mistake while other times the task was not completed correctly and the next task can not proceed. This has the effect of loop and in many cases can replace a "formal loop". Consider this example.
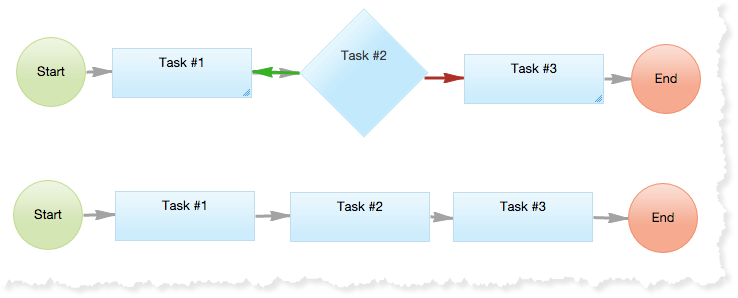
The decision task isn't needed as in the bottom workflow Task #2 can just "Reject" back to Task #1 if the user responsible for Task #2 found an problem with Task #1. For example, if Task #1 was 'Complete Contract' and Task #2 was "Verify Contract" the users could send the contract back with a reject. In reality, every task in Flowmingo is a loop since every task can be rejected to it's parent.
Video Tutorials
This tutorial walks you through building a simple workflow